
 This is a simple tutorial on using image adjustments to make a colorful, graphic image.
1. The first thing you want to do is take a picture of an interesting subject. I decided to use this image of a vase and flowers. I chose it for the color variety and I thought it was cute that the word "Examples" was in the background.

2. Duplicate the image in the layers palette 2 or 3 times. The short-cut is Ctrl+J.

3. Threshold. Threshold is an image adjustment that converts a color image into a high-contrast, black and white image. At the top of the window we are going to go to Image > image adjustments > threshold. You will need to scroll left or right to get the contrast you desire.
I decided to add threshold to two images so later on I can mask out the dark shadows in the flowers.


4. Hue and Saturation. Hue and saturation is another image adjustment. Hue is another word for color. I decided to really play with the hue control. I wanted bright, exaggerated colors. There have been times I turn up the saturation control in order to get brighter colors.

Here are what all the layers look like in the layers palette. I have the two threshold images, one with the hue adjustment and the original image on the bottom. I always like to keep a copy of the original image in case I need to start over. Make sure the threshold images are on top in the layers palette.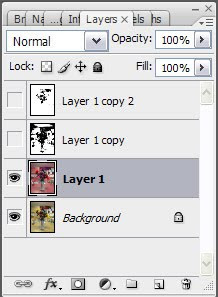

5. Blend Mode. The two layers with the threshold adjustment will have a blend mode applied. Blend modes take either the black or the white pixels and blend them into the layer underneath. I chose to apply a Darker Color blend mode. I thought it gave the affect I was looking for but you may choose to use something different. This blend mode took the white pixels and blended them into the background layer.

After applying the blend modes I felt there was too much black and the details in the flowers got lost. The way to solve this is through using a masking layer.

6. Masking Layer. Masking layers give you a way to reveal or conceal the image below. Basically, it is a non-destructive way to erase parts of an image.
First, apply the masking layer. Then, by painting with black paint the image will start to erase away. If you make a mistake and erase something you did not want, just swap the color to white and you can paint the image back.
 Black
Black White
White
After I masked away some of the black from each of the flowers to show more detail. I also masked out some of the darker areas of the ribbon.
You can really get some neat images from this activity. I created the image in the Welcome! post with these same tools.
No comments:
Post a Comment